TL;DR:
- High-quality photos are essential for selling designer bags online because they help buyers see details that can’t be experienced in person. Proper preparation, lighting, and angles ensure the bag’s appearance is accurate and appealing, increasing the likelihood of a quick sale at full asking price. Consistent, honest images that showcase all accessories and flaws build trust and improve listing success.
Selling a designer bag online without great photos is like wearing a Chanel jacket to an interview and leaving it in the car. The bag does the work only if buyers can actually see it. Knowing how to photograph designer bags for sale is the single biggest factor separating listings that move fast at asking price from ones that sit for weeks collecting lowball offers. Shoppers cannot touch the leather, smell the suede, or check the hardware in person. Your photos do all of that for them. This guide covers everything you need: gear, prep, shooting angles, editing, and the mistakes that kill sales before they start.
Table of Contents
- Key Takeaways
- How to photograph designer bags for sale: equipment and setup
- Preparing the bag before your shoot
- Shooting techniques: angles, lighting, and composition
- Editing and post-processing your photos
- Common mistakes that hurt handbag listings
- My honest take on what actually makes the difference
- Take your selling further with Naiseshopper
- FAQ
Key Takeaways
| Point | Details |
|---|---|
| Resolution matters immediately | Use a smartphone from 2020 or later, or a mirrorless camera, to meet the 24MP minimum for sharp zoom. |
| Shape sells luxury | Stuff your bag correctly with tissue paper so it holds its natural silhouette without looking distorted. |
| Lighting angle is the secret | Position your key light at 30 to 90 degrees to reveal texture and prevent flat, lifeless shadows. |
| Shoot at least five photos per listing | Cover the hero shot, back view, close-up details, condition proof, and a completeness shot with accessories. |
| Edit for accuracy, not beauty | Correct color and exposure to match real life. Over-filtering misleads buyers and damages trust. |
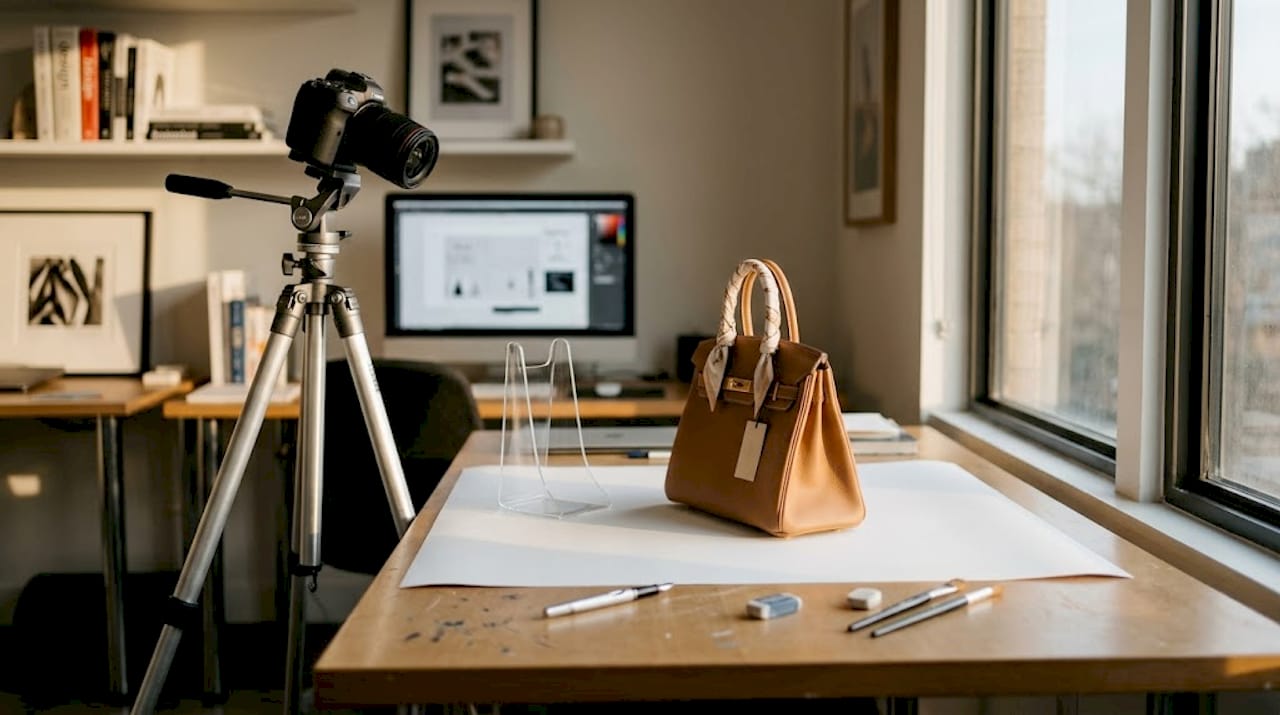
How to photograph designer bags for sale: equipment and setup
You do not need a studio to get professional results. What you do need is the right combination of gear and a clean, controlled environment.
Camera and resolution
Minimum 24MP resolution is the baseline for e-commerce photography where buyers want to zoom into stitching, hardware, and logos. Any smartphone released in 2020 or later will hit this standard. iPhones from the 12 series onward and recent Samsung Galaxy models all qualify. Mirrorless cameras like the Sony a6000 series give you more control over depth of field, but they are not required for great results.
Lighting options
| Lighting Type | Best Use | Cost Range |
|---|---|---|
| Natural window light | Soft, even fill for leathers and suedes | Free |
| LED panel with diffuser | Controlled indoor shooting any time of day | $50 to $200 |
| Ring light | Good for overhead flat-lay shots | $30 to $80 |
| Reflector (white foam board) | Fills shadows on the opposite side of key light | $5 to $15 |
Natural north-facing window light on a cloudy day is genuinely your best friend for photographing luxury handbags. It is soft, directional, and free. If you shoot indoors at night, a daylight-balanced LED panel with a diffuser fabric over it replicates that effect beautifully.
Backgrounds and stabilizers
Clean backgrounds keep focus on the bag. White seamless paper is the e-commerce standard. A full roll costs around $20 at any photography supply store. Gray or light beige works well for bags with bright or metallic finishes where pure white creates too much contrast. For lifestyle context, a marble tile or a linen-textured surface can add personality without distraction.
A tripod stabilizes your camera and eliminates the blur that kills otherwise good shots, especially in low light. A $30 entry-level tripod beats handheld shooting every single time.
Pro Tip: Pick up a cheap purse stand or clip-style display stand online. These are under $15 and make keeping a structured bag upright completely effortless during shooting.
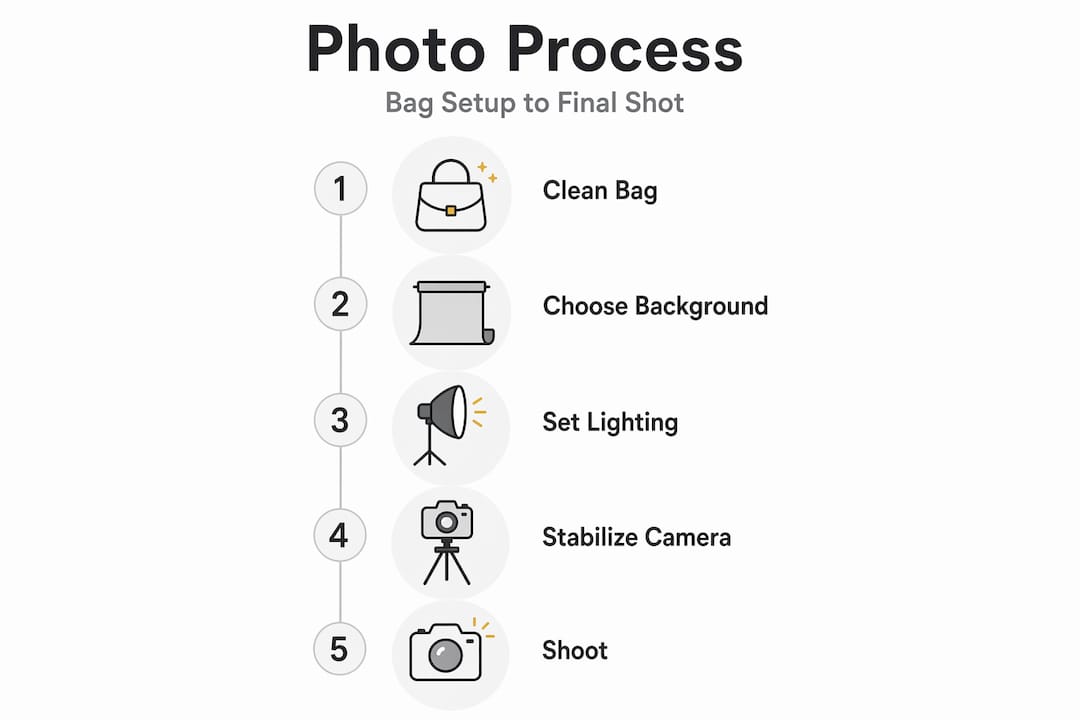
Preparing the bag before your shoot
How you prepare your bag matters more than most sellers realize. A pristine, beautifully positioned bag shot with a phone camera outperforms a dusty, slumped bag shot with a professional camera every time.
Here is the preparation sequence to follow before every shoot:
- Clean the bag thoroughly. Use a lint roller on fabric interiors and suede trim. Wipe leather surfaces with a dry microfiber cloth. For more detailed care advice, check out Naiseshopper’s guide on luxury bag care before your shoot.
- Put on white cotton gloves. Wearing cotton gloves keeps fresh fingerprints off leather and suede surfaces, which means far less editing afterward.
- Stuff the bag with tissue paper. Fill it enough to hold its natural shape. The rule here is simple: too little causes slouching; too much distorts the silhouette and makes it look unnatural. Tissue paper is ideal because it is acid-free and light enough to give shape without bulk.
- Position straps and handles deliberately. A shoulder strap draped naturally over one side adds dimension. Chain handles can be spread flat or crossed in a way that shows off their design. Try both and see which reads better in your frame.
- Remove all tags, stickers, or unrelated items. Your listing will mention authentication cards separately. Keep the shot focused.
- Document any scuffs or wear honestly. Photograph those spots clearly and include them. Buyers who discover unlisted flaws after purchase leave bad reviews and request refunds. Honest photos protect you.
- Use invisible supports if needed. Fishing line from a boom arm keeps floppy straps or chain handles in an elevated, stylish position that would otherwise be impossible to maintain by hand.
Pro Tip: Shoot a quick test frame before committing to your full setup. Look at it on a larger screen, not just your phone, to spot creases in the background paper or uneven lighting before you take 40 photos you will have to reshoot.
Shooting techniques: angles, lighting, and composition
This is where your listing either earns buyer trust or loses it. Getting the angles right is the difference between a listing that looks like a professional consignment shop and one that looks like a garage sale.
The five essential shots
A strong listing needs at least five photos that together answer every question a serious buyer has:
- Hero shot. Front-facing, bag fully structured, centered on a clean background. This is your cover image. Everything about it needs to read “professional and authentic.”
- Back or alternate view. Some Chanel quilts or Bottega Veneta intrecciato weaves look just as impressive from the back. Show it.
- Detail close-ups. Zoom in on the logo plate, stitching, zipper pull, and hardware. These shots communicate quality and authenticate the piece visually.
- Condition documentation. Any corner wear, color transfer, or patina should be photographed clearly in good light. This builds trust, not doubt.
- Completeness shot. Lay out everything the bag comes with. Dust bag, authenticity card, box, extra strap, receipt if available. All of it in one clean flat-lay.
Lighting placement for texture and shine
Position your key light at 30 to 90 degrees to the side of the bag. This angle catches surface texture beautifully, making pebbled leather, canvas grain, and quilted patterns pop with dimension instead of appearing flat.
Metal hardware deserves special attention. Manage reflections with diffusers and flags, not polarizing filters. A polarizer kills the gloss on gold chain hardware, and that gloss is exactly what signals luxury to a buyer scanning through listings. You want the shine. You just want it controlled, not blinding.
Angles that add depth
Experiment with a 45-degree angle from above and slightly to the side. This perspective works brilliantly for structured bags like a Gucci Horsebit 1955 or a Saint Laurent Sac de Jour because it shows height, width, and depth in one shot. Overhead flat-lay angles suit smaller, flatter pieces like wallets, clutches, or pouches.
Pro Tip: Set your camera height to align with the midpoint of the bag, not the top or bottom. This avoids the distortion that makes bags look taller, shorter, or wider than they actually are.
Avoid direct flash at all costs. It blasts the surface with flat light that erases texture and creates harsh white glare on hardware. If you are shooting indoors without a window, a diffused LED panel placed to one side with a white foam board reflector on the opposite side creates a clean, balanced look without any flash needed.
Editing and post-processing your photos
Editing is not about making your bag look better than it is. It is about making your photos accurately represent what the bag looks like in real life.
Here is a practical editing checklist:
- White balance first. Adjust this until the bag’s actual color reads true. Leather that photographs orange under warm indoor light should look tan in your final image.
- Exposure and contrast. Bring up shadows slightly to reveal texture. Bring highlights down if hardware is blowing out.
- Crop and straighten. Keep the bag centered with consistent spacing around all sides. A slightly crooked horizon line reads as careless.
- Background cleanup. If your seamless paper has a crease or smudge, use a spot healing tool to fix it. Do not replace the entire background with a fake white unless your marketplace requires it.
- Maintain at least 1600px resolution on the longest side so buyers can zoom in on platforms like eBay, Vestiaire Collective, or Depop without the image pixelating.
- Export as JPEG or PNG. JPEG at 80 to 90 percent quality hits the right balance between file size and sharpness.
Good free tools for beginners include Snapseed and Lightroom Mobile. Both have white balance sliders and cropping tools that handle everything on this list without a steep learning curve.
Pro Tip: Check your edited photos on both your phone and a laptop before publishing. Colors render differently across screens, and what looks accurate on your phone may look oversaturated on a buyer’s monitor.
Common mistakes that hurt handbag listings
Most sellers make the same handful of errors. Recognizing them early saves real money.
- Overstuffing. A Prada Galleria that looks like it is about to burst reads as distorted, not luxurious. Stuff to natural shape only.
- Inconsistent lighting. Mixing a warm-toned lamp with cool window light creates muddy, unflattering color casts that are hard to fix in editing.
- Wrinkled or dirty backgrounds. A creased backdrop immediately signals amateur. Distractions in the background reduce professionalism and pull attention away from the bag.
- Handheld shooting. Even slightly blurred images lose buyer confidence fast. Use that tripod.
- Skipping the detail shots. Buyers looking at a $1,200 Saint Laurent bag want to see the logo stamp, the hardware finish, and the interior label. Missing these shots raises doubts about authenticity.
- Over-filtering. Heavy presets that boost warmth and saturation make bags look stylish on Instagram but misleading in a resale listing. Buyers expect accuracy.
Pro Tip: Before going live, ask a friend who has never seen the bag to look at your photos and tell you what questions they still have. Every unanswered question is a reason not to buy.
My honest take on what actually makes the difference
I’ve looked at thousands of resale listings, and the pattern is always the same. The sellers who consistently get full asking price or close to it are not the ones with the fanciest cameras. They are the ones who took the time to properly prepare their bag and control their light.
In my experience, lighting accounts for roughly 70 percent of the final image quality. A well-lit shot with a decent smartphone beats a poorly lit shot with a mirrorless camera every single time. What I’ve found is that most beginners rush past preparation and straight to shooting. That is the biggest mistake. If your bag is not clean, shaped, and positioned beautifully before you take the first frame, no amount of editing will fully fix it.
I also think sellers consistently underestimate the value of that completeness shot. Buyers who see the dust bag, card, and box laid out neatly in one frame convert at a noticeably higher rate. It signals care, authenticity, and that the seller is organized enough to be trusted.
The other thing I keep coming back to is consistency. Pick a setup, a background, and a lighting arrangement, then stick with it. Your listings start to look like a curated shop rather than a random collection, and that professionalism compounds over time. If you are thinking seriously about which bags are worth photographing and selling, Naiseshopper’s guide on handbag resale value is a sharp read for understanding what buyers actually pay for.
— Camila
Take your selling further with Naiseshopper
Great photography gets buyers to click. What they find next determines whether they complete the purchase. If you are building out your knowledge of the designer resale world, Naiseshopper has the resources to help at every stage.
From understanding how to spot authentic designer bags to knowing which pieces hold their value best, Naiseshopper’s editorial library covers the full picture. Whether you are photographing a Balenciaga City, a Gucci Bamboo, or a classic Chanel Flap, knowing the market context for what you are selling helps you price it correctly and present it with confidence. Explore Naiseshopper’s curated guides and resources at naiseshopper.com and step into the resale space with real expertise behind you.
FAQ
What camera do I need to photograph designer bags for sale?
Any smartphone from 2020 or later meets the minimum 24MP standard for e-commerce. Mirrorless cameras give you more control, but a modern iPhone or Samsung delivers professional results.
What is the best lighting for handbag photos?
Soft natural light from a north-facing window on a cloudy day is ideal. If shooting indoors, use a diffused daylight-balanced LED panel positioned 30 to 90 degrees to the side of the bag to bring out texture.
How many photos should I include in a designer bag listing?
Aim for at least five: a hero shot, a back or alternate view, detail close-ups of hardware and logos, a condition documentation photo, and a completeness shot showing all included accessories.
How do I keep a bag looking structured in photos?
Stuff the bag with acid-free tissue paper until it holds its natural shape. For straps or handles that need to stay elevated, use fishing line attached to a boom arm for a discreet, clean look.
Should I edit my handbag photos before listing?
Yes, but keep it accurate. Adjust white balance, exposure, and crop for clean presentation. Export as JPEG or PNG at a minimum of 1600 pixels on the longest side so buyers can zoom in without loss of quality.